User Guide: Petty Cash Screen
Overview:
Petty cash
screen streamlines the process of
creating and managing petty cash payments, making it easier for users
to
maintain accurate records of small expenses.
- Feilds
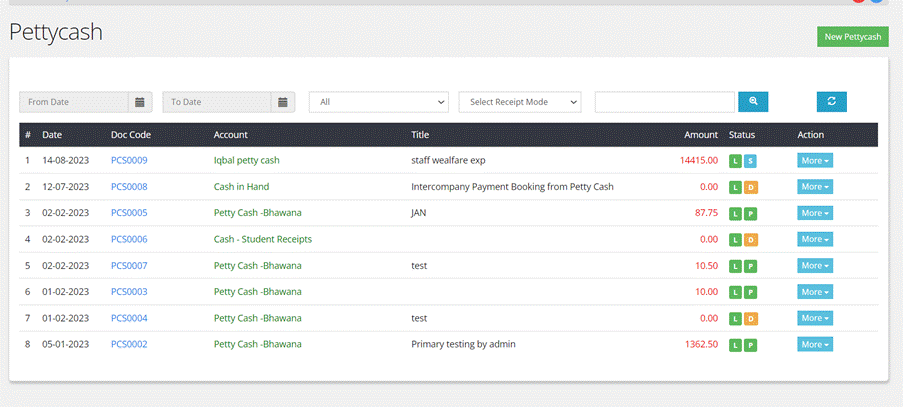
- Transaction Date: This column displays the date when the petty cash
transaction occurred. It helps in sorting and identifying
transactions based on their date.
- Document Code: The document code is a unique identifier or reference
number assigned to each petty cash transaction. It helps in quickly
referencing and tracking specific transactions.
- Account: This column represents the petty cash account from
which the expenses are being paid.
- Descriptive Title: It offers clarity about what the transaction is for.
- Amount: This column displays the total amount involved in
each petty cash transaction.
- Status: The status column indicates the current state of the
transaction. It has values like posted, live, cancelled, saved
statuses to track the progress of the transaction.
- Other Actions: This column contains action buttons that allow users
to perform various actions on the transaction, such as viewing more
details, editing, approving, cancelling, or printing related
documents.
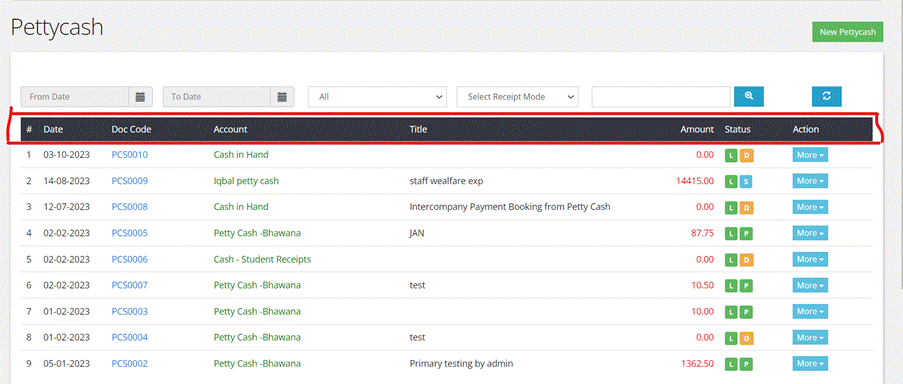
- Filters:
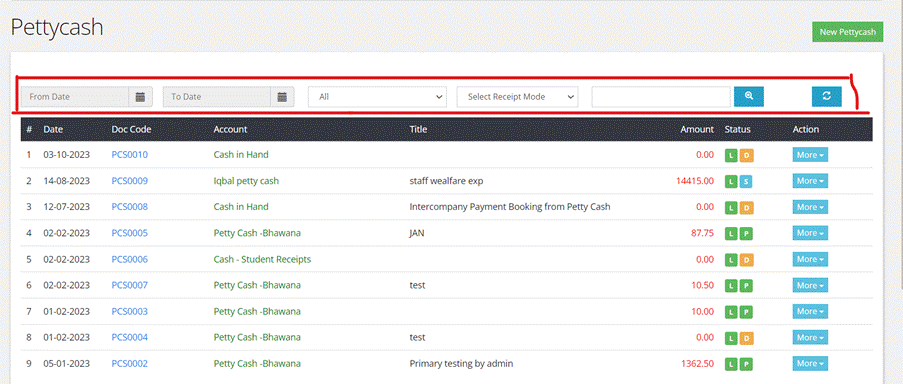
- Date Range: Users can apply a date range filter to limit the
display of petty cash transactions to a specific time frame. For
example, they can choose to see transactions within the last week,
month, or a custom date range.
- Status: This filter allows users to filter transactions based
on their status. They can choose to view transactions that are
pending, approved, cancelled, or any other relevant status.
- Receipt Mode: The receipt mode filter may be used to categorize
transactions based on how receipts or documentation are handled. For
instance, users can filter transactions where receipts are provided
electronically or in physical form.
Creating
a New Petty Cash
Step
by step process
- Click
on ‘Petty cash’ from the Menu.
- Press the ‘New
petty cash’ button on the top right of the screen.
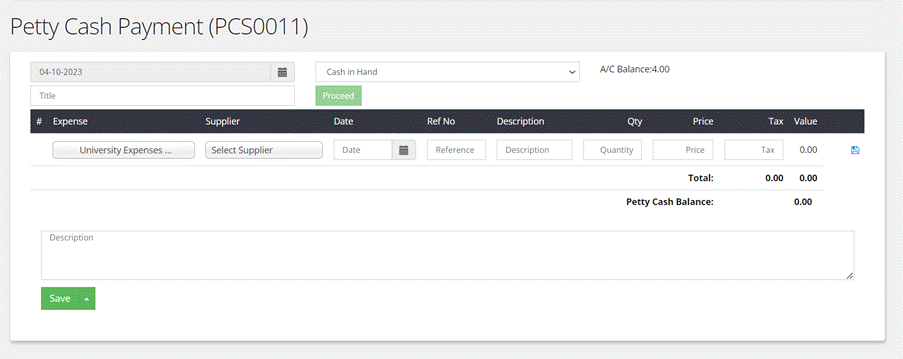
2.
Enter Transaction Details:
Start
by entering the essential transaction
details, which typically include:
- Transaction Date: Select or enter the date of the petty cash
transaction.
- Petty Cash Account: Choose the appropriate petty cash account from a list
of predefined accounts.
3.
Proceed to Expense Entry:
·
After entering the transaction
details, click on the "Proceed" button to continue.
4.
Expense Entry:
In
this step, you will enter the details of the expense for which the
payment is
being made. The fields to complete may include:
- Expense Account: Select the account associated with the expense.
- Supplier Name: Choose the supplier from a list or enter their name.
- Date: Specify the date of the expense.
- Reference Number: Enter a reference or receipt number for the expense.
- Quantity: Input the quantity of items purchased, if applicable.
- Description: Provide a description of the expense, which can be
helpful for tracking.
- Price: Enter the price or unit cost.
- Tax Value: If applicable, input the tax amount associated with
the expense.
5.
Save Individual Entry:
·
After entering the expense details,
click the "Save" " button to save the individual expense entry.
6.
Provide Additional Description (Optional):
·
If there is additional information
or notes related to the petty cash transaction, user can provide a
description
in a designated field.
7.Save
Entire Transaction:
·
Finally, once all individual
expense entries are added, click the "Save" button to save the entire
petty cash transaction.