User Guide: Contra Entry Screen
Overview:
A
contra entry is a type of accounting transaction that involves the
transfer offunds between two accounts within the same organization. It
typically involves
cash or bank transactions that need to be recorded in the accounting
books.
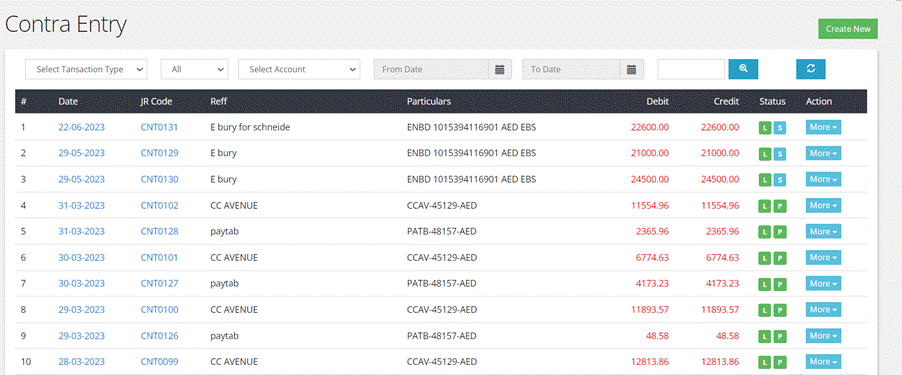
- Fields

·
Date:
This is the date on which the contra entry transaction took place.
·
Journal Code:
The journal code is a unique code assigned to the journal in which the
contraentry is recorded.
·
Reference:
The reference fields show from which bank account amount is transferred
from
·
Particulars:
This shows to which bank account amount is transferred to.
·
Debit Amount:
The amount recorded in the debit column represents the value being
transferredfrom one account to another.
·
Credit Amount:
The amount recorded in the credit column represents the value received
or addedto another account.
·
Status:
The status of a contra entry can be either "Posted", “cancelled”,“save”,
“live”.
·
Action:
This field may include information about any required actions related to
thecontra entry, such as edit, approve, post, cancel and print document.
- Filters
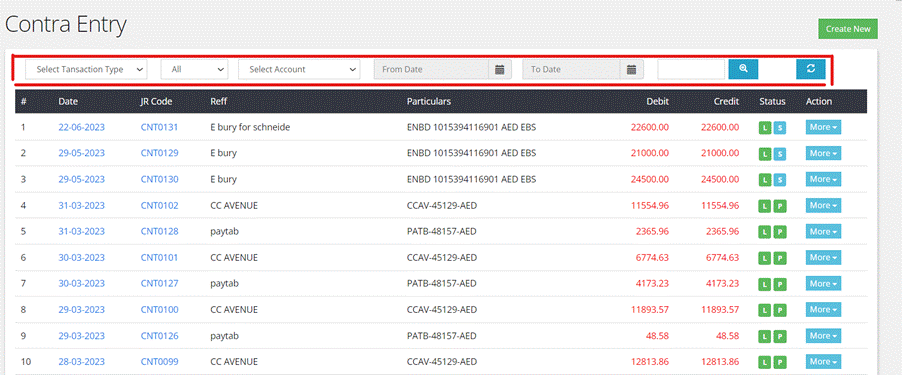
- Transaction Type: User can filter contra entries based on their type.
Contra entry types include "General" (regular fund transfer) and
"Provision for Doubtful Debt" (a specific type of contra entry related
to setting aside funds for potential bad debts).
- Status: Can filter contra entries based on their status, such
as "Posted" or "Unposted."
- Account: This filter allows to search for contra entries
associated with specific accounts, such as cash, bank accounts.
- Date Range: User can specify a date range to filter contra entries
based on when the transactions occurred.
Creating
a New Contra Entry
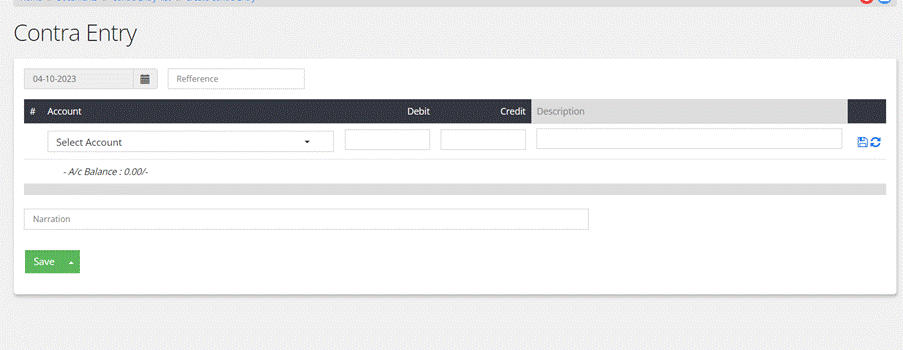
Step by Step Process
1. Access Contra
Entry
Screen:
- Click on ‘Contra
Entry’ from the Menu.
- Press the ‘Create
New’ button on the top right of the screen
2.
Transaction Date:
- Select the date on which the contra entry transaction
occurred. This is the date when the funds were transferred between
accounts.
3.
Enter Reference:
- In the "Reference" field, provide information about the
bank or source from which the amount is being transferred. This
reference helps identify the source of the funds.
4.
Select Account (Transfer To):
- Choose the account to which the amount is being
transferred from the given list of accounts. This is typically a bank
or another relevant account.
5.
Debit and Credit Amount:
- Enter the debit amount and the credit amount. The debit
amount represents the account from which funds are being transferred,
and the credit amount represents the account to which funds are being
transferred.
6.
Provide Description (if necessary):
- If there are specific details or a description that needs
to be associated with this contra entry, user can enter it in this
field. This can help provide additional context for the transaction.
7.Save
Individual Transaction:
- After entering all the required information for the
individual contra entry, click on "Save" button.
8.Write
Remark (if needed):
- If there are any remarks or comments user want to add to
the contra entry for future reference, they can add in this field.
9.
Save the Entire Transaction:
- Save the entire transaction so as to reflect in accounts.